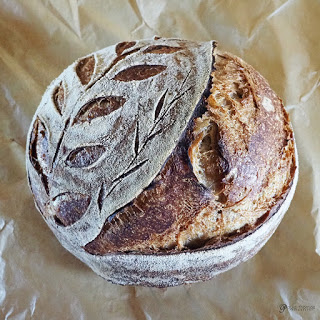
I received my first sourdough starter from a friend recently and I made my very first loaf. I was actually surprised how well it turned out and after sharing the photos on social media I had lots of requests to share my recipe. I didn’t follow any one recipe or method for my first loaf. I spent a lot of time watching YouTube videos and looking at recipes on blogs to come up with my own recipe. If you haven’t made sourdough before, it’s normally a two day process but some people have come up with shortcuts to fit it into one day by adding a bit of bread yeast to help the dough rise more quickly. For the best sourdough flavor I think 2 days is best.
I used 3 different flours from Janie’s Mill for this loaf. Janie’s Mill has a variety of great organic flours and delivery was pretty quick considering how busy I’m sure they are at this time. Here are a few photos of how the dough looked after scoring, just before putting in the oven and how the finished bread looked. I couldn’t have been happier with the look, texture and flavor of my first loaf.
If you don’t have a proofing bowl you can use any bowl. Just line the bowl with a well floured tea towel to keep it from sticking.
From my sourdough research I found a dutch oven is the best vessel for baking your sourdough in. It helps the bread steam for the first half of baking. If you don’t have a dutch oven, you can add a tray of water below the bread and also spray some water on the sides of the oven to help steam the bread and bake the bread on a preheated pizza stone or a cast iron skillet.


Artisan Sourdough Bread Recipe
Ingredients:
128g 100% hydrated starter (equal parts water/flour)
247g room temperature water
263g high protein wheat flour
75g artisan wheat flour
37g rye flour
12g salt
Directions:
Day1
- Feed sourdough starter around 9am and let activate for about 4 hours, until at least double in size. You know when it’s ready if a spoonful floats in water. If it doesn’t float, it needs more time.
- Stir together starter and water then add in flours and mix until combined. Cover and let rest for one hour.
- Move the dough to a large cutting board or a clean counter, use a wet dough scraper if needed. Wet fingers and push dough out with your fingers to about an 8″ round. Sprinkle the salt evenly over the dough. Keep fingers wet to avoid dough sticking to them and stretch and fold the dough. (pull out each side without breaking and fold it back down just past center). See https://youtu.be/1timJlCT3PM for a good example of how to stretch and fold dough. It will be sticky. Do not add any flour to the dough. Turn the dough over so the seam side is down. Cover with a bowl and let rest 30 mins.
- Repeat stretch and folds every 30 mins at least 3 times but I did 5 times. After last stretch and fold, transfer to a bowl, cover with saran wrap and put in fridge overnight.
Day2
- In the morning scrape the dough onto floured counter or cutting board and stretch and fold to pre-shape into a ball, with assistance from a bench scraper if needed. Turn dough over with seam side down and let rest for 30 mins. See https://youtu.be/8uz97MZZmRg for a good example on how to do pre-shaping and final dough shaping.
- Add a bit more flour and turn dough over so seam side is up. Stretch out dough slightly and fold into final shape whether it be a ball or an oval. See shaping video in step 1. Dust proofing bowl with flour and place dough seam side up into bowl. Cover bowl with towel and refrigerate 3-4 hours.
- Preheat oven with dutch oven (with or without lid, I did without) for 30 mins at 500 degrees.
- Transfer the dough seam side down onto a piece of parchment paper. Dust the top with flour and score the top with a razor or serrated knife. You can google sourdough scoring to get some ideas on designs. I like the leaf design so used a series of small slits in a row with one big slash down one side, pictured above. Transfer the dough with the parchment to the hot dutch oven and bake covered for 20 minutes.
- Reduce temperature to 450 and remove the lid and bake for additional 25-30 minutes.
- Open oven door and let bread cool for about 20 mins before transferring to a wire rack to cool for at least 40 more minutes before slicing.

